Posts

Showing posts from 2013

December Already!!

Image
I really can't believe it is December already!! I've failed at making my garment of the month already :( I have managed to cut it out, it just needs putting together now. So I will have to extend this garment to 'Make a Garment over 2 months'! Have a great December!! Jolanda x
Image
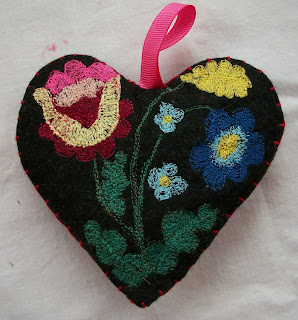
Hi everyone,  been practicing free motion embroidery to make these little hangers  It's gradually getting easier. I'm using the darning foot and moving the material with my hands.  I found it really awkward to hold a hoop, but this way seems to work well. :)

November's Make a Garment a Month Challenge

Image
Hello, I hope you are all having a good weekend. Well, I have finally made a decision and this is the dress I am going to make. It's from a supplement of extra patterns from the October issue of Knipmode. And this is the very busy fabric I am going to use! I'm not that used to such bright patterns, usually staying safe with plain fabrics. So I thought I should start to be a bit more daring and colourful! pop over and see what everyone else is making and join in. Last month's creations are there and they are fantastic. Thanks for visiting Jolanda x

Make a garment a month - finished garment for October!

Image
And here it is!  the finished skirt I am ever so pleased with it - the pleating on the front was much more straightforward than I thought it would be.  All in all it was a very quick make. The skirt is a bit creased as I had been wearing it all day in these photos.  sometimes it's harder to get a photograph than actually sewing! So now the challenge is to think of what to do for next month's challlenge, which is a challenge in itself!! Do I make a fake fur jacket or wrap dress? mmm... or maybe both? Well I have 3 more days to decide :) If you want to join in the challenge press the button on my sidebar, it's an ongoing challenge and anyone can join in. Thanks for visiting, I'm now off to visit the other in this challenge to see their makes :) Jolanda x

Make a Garment a Month Challenge

Image
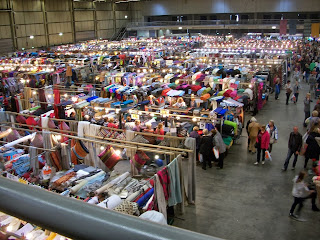
Hi, Hopefully better late than never with this challenge !!  I have recently been to Eindhoven in Holland to visit my daughter and also do a bit of fabric shopping! Not too sure I should show you my 'little' bag of fabric that now has to be made into clothes! The photo below is of the Stoffenspektakel which is a travelling 'fair' of fabric!! it was amazing to see so many fabrics; the stallholders had even made up clothing in the fabric they were selling so you could see it off the bolt, (a really great idea). After this extravaganza I had to visit Eindhoven's market where there were about 20 stalls selling fabric and haberdashery and so cheap too! This black fabric below was only 1 euro a metre!!! (less than £1)  I will be making this skirt with this fabric. Not too sure about how it will look with the pleating or even how to do the pleats, but will have a go. If things don't work out too well the skirt might lose it's pleats. :)

shabby chic tattoo hanging hearts

Image
 Some hearts I have made using Urban Threads embroideries on calico.  roses on the back of the skull heart  Anchors and ships wheel on the back of the anchor and birds embroidery

in the hoop bunny - Urban Threads Freebie

Image
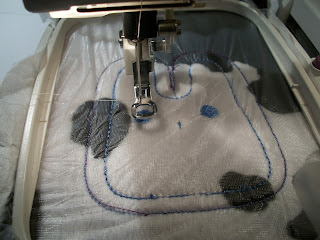
 I thought I would show you my first in the hoop project.  My hoop is 10cm x 10cm so the finished bunny if quite tiny but cute! First you put your material in the hoop that you want to be the front (with the face on) embroider this and when the machine stops you put the 'back' on face down. The instructions say to spray repositional adhesive but I used a piece of masking tape to hold it down.  When the outline has been stitched you take it out of the hoop and cut around. Turn inside out and there you have a flat bunny!! wow! so easy  Here is the bunny stuffed - isn't she gorgeous. I sent her off to my niece - I hope she loves her. I think I could get quite addicted to bunnies now!

Shabby Chic mobile phone cover

Image
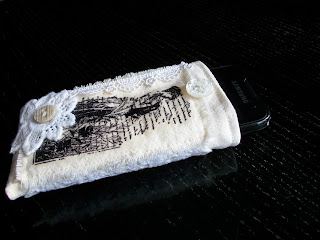
This cover is made from calico and also lined in calico. The lady has been stamped and transferred onto a panel of calico

embroidered mobile phone cover

Image
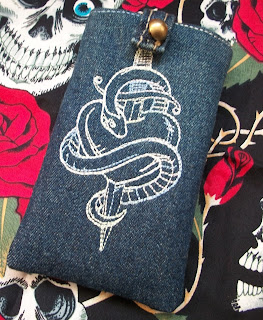
Hi, hope you are having a lovely weekend. At last I have made a cover for my mobile phone, I've been meaning to make one for so long but never got round to it. I 'upcycled' my son's denim shorts for this project. The front is embroidered with Sulky variegated thread. The embroidery is a thread tattoo by Urban Threads.  they have great embroideries and freebies too! This is a great way to use up scraps - I lined the cover with a piece of leftover gingham too! The tab is a belt loop from the shorts. Thanks for visiting Jolanda x

spotty dotty crossover top

Image
Hi, A few weeks ago I bought some lovely red polka dot jersey from my favourite fabric shop in Norwich. It is just too nice to make a plain t-shirt top, so I flicked through all my old Knipmode magazines and found the perfect pattern in the June 2005 issue. The top is pictured in the top right hand corner. So I got stitching and came up with this It was very easy to sew indeed! Everything fitted together perfectly ... I love it when that happens (it doesn't seem to happen that often!) The only downside is that it is a little on the short side - which is unusual as usually I have to make things a little shorter!  I am glad I am not 1.80m tall. which is the size the pattern goes up to. It looks ok with this high waisted skirt though but the skirt is a lot too tight on me, so I will have to find a way of enlarging it somehow. Thanks for visiting Jolanda x

cheeky panties by emily kate

Image
Hi there, I thought I would share with you my new underwear! I have never made underwear before but thought it would be nice to have some underwear to match my clothes. I downloaded a FREE pattern from Burda Style website. The pattern is super easy to make and super fast - just over an hour (it was my first attempt so I took it slow) I used my overlocker for the seams and for attaching the picot elastic. Then turned the elastic to the inside and zig zagged the edge from the front. The leg openings look a little stretched but when worn this doesn't show at all. I have worn them now and they are very comfortable, I will certainly be making some more! Thanks for visiting Jolanda xx

The finished cherry dress

Image
At last! the finished dress. This did take me quite a while to make because of the flat piping!   I wasn't sure of the best way of attaching it, especially around the neck, so lots of sample were made first!! This is a close up of the binding (doesn't look that straight in the photo but believe me it is!) The gorgeous material was bought at Anglian Fabrics on Magdelen Street in Norwich, and the belt was a bargain find in Debenhams. The pattern for this dress is in the Dutch Knipmode magazine from a few years ago. Thanks for visiting me Jolanda x

sewing a straight line to get my flat piping perfect!

Image
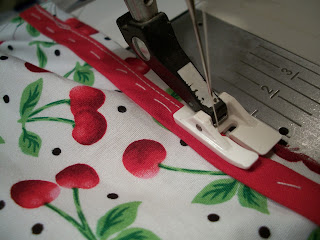
Hi Everyone!  This is the third time I have made this dress style and needed to make it a little bit different. I like the look of flat piping opposed to corded on the edges of a dress but this posed a little problem for me as I couldn't butt the presser foot up against the cord to sew a straight line.  First, I tried a normal foot but couldn't do it very straight and then used my blind hem foot (pictured below)   It butts up against the edge of the piping to give a perfectly straight stitching line. Next I pinned the facing over this and turned the whole piece over. Sorry for the bad photo, but I think you can just see the stitching line to the right of the foot; I used this as a guide and stitched slightly to the left to join the front, piping and facing together. So when I turned everything to the right side my piping was perfectly level all round. (my two rows of stitching on the armhole before turning) Thanks for looking pictures of the fin

make your own bias binding

Image
My sewing class tutor gave me a great tip to make bias binding without buying a gadget; just using a pin and an ironing board! I hope you can see in the photo that I have pinned a longish pin to the ironing board and folded over the bias band under it.  As you pull it along you can iron it. The gap determines the size of your folded bias binding, so with a bit of adjustment you can make different sizes. Soon I'll show you what I did with it! Jolanda x

Top from Burda Style 2/2010

Image
Hi everyone, Hope you're having a lovely weekend!  There are some really nice patterns in this magazine (Burda 2/2010), but I haven't made any yet. I find Burda patterns don't fit my body shape as well as Knipmode, but I thought this pattern was so nice and practical and happening to have some lovely stripes in my stash, I thought I would give this one a go!  The pattern is very easy to make up and I made most of this on my sewing machine. The fabric is a velour so it was a bit heavy around the neck and too big. The make the top fit my bust the neck was far too loose so I took in the front at the sides against the sleeves. Unfortunately, this left a gape above the bust so I made some pleats - I think they look ok when worn.  I will be making this top again but now know how much to adjust the pattern to fit before cutting out!! I am linking this to Sew and Tell Saturday on Sew Country Chick blog. The link button is on the right side bar. Tha

crossover top from Knipmode

Image
This is my first make from my advanced dressmaking course. I bought the material back in 2008 in Leiden, Holland!! It's about time I used it. I have never used an overlocker before so this was the perfect time to try one out. The material is a very soft 4-way stretch and I've been scared to stitch it on my sewing machine. The overlocker was so easy to use, I quite fancy one now!! £££ The seams were overlocked and the hems were stitched on my machine using a twin stretch needle. I hand tacked everything but it was worth the result. I'm very pleased with it and it fits very comfortably. The front is a bit low so I bought a camisole top for modesty!!  Thanks for looking Jolanda x

New Sewing Journal

Image
A new journal to record my adventures at my dressmaking course. These papers were free with homemade magazine some time ago. more pages to follow. Jolanda x

needlecase

Image
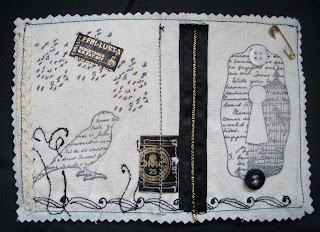
Hello, I have signed up for an advanced dressmaking evening course at the local college.  I am so looking forward to it - hopefully I will learn some new techniques and tips! I needed a case to hold my needles and stop them going rusty.  I made this one from some remnants of calico, ribbon and gold cord. I stamped the images using archival ink and used a decorative stitch on my sewing machine. The back has a little free machine embroidery too!  My first attempt at such a thing! Hope you like it Jolanda x